
Few culinary pleasures rival the aroma of crusty mini baguettes at home, emerging warm from your own oven. These petite loaves carry all the charm of a Parisian bakery, crackly crust, airy crumb, and the satisfying sound of a loaf that sings as it cools. Today, we’re transforming humble pantry staples into bakery-quality bread right from your kitchen. You’ll find step-by-step visuals referenced throughout, ensuring even beginners can master these beautiful baguettes.
Table of Contents
Crusty Mini Baguettes at Home
Prep Time: 15 minutes (plus 1 hr 30 min rising time)
Cook Time: 20 minutes
Total Time: 1 hour 65 minutes
Servings: 6 mini baguettes
Calories: ~180 per baguette
Ingredients
- 3 cups (360g) bread flour
- 1 cup (240ml) warm water, 100–105°F
- 2 tsp (7g) active dry yeast
- 1 tsp sugar
- 1 ½ tsp salt
Step-by-Step Instructions
- In a mixing bowl, combine warm water, sugar, and yeast. Let it bloom for 5–7 minutes until foamy.
- Add flour and salt. Mix until a shaggy dough forms, then knead for 8–10 minutes until smooth.
- Place dough into a lightly oiled bowl, cover, and let rise for 1 hour or until doubled.
- Punch down the dough and divide into 6 equal portions. Roll each into a 6–7 inch mini baguette (see shaping image).
- Transfer to a parchment-lined baking sheet. Cover and rest 20 minutes.
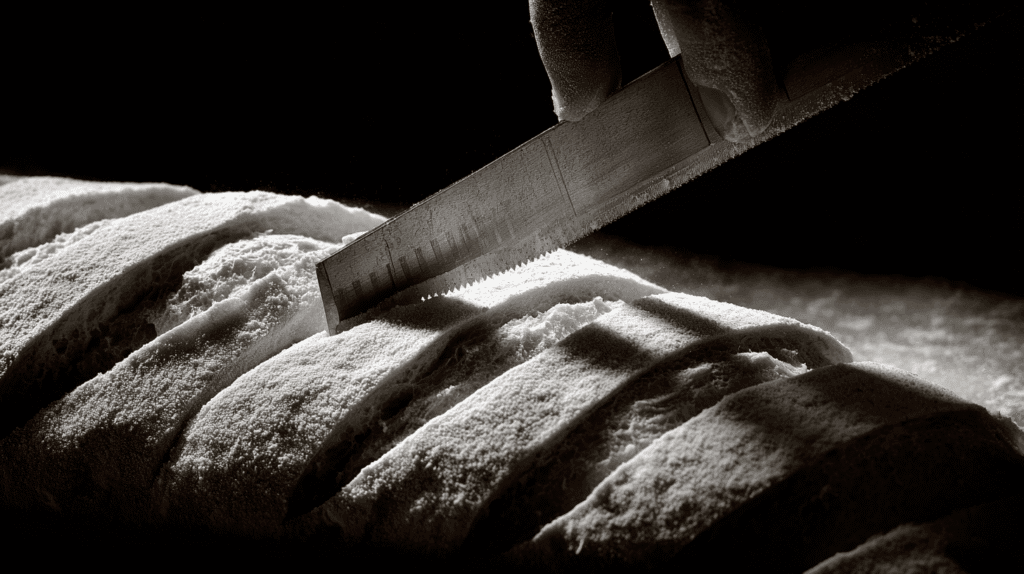
- Preheat oven to 475°F. Add a metal pan at the bottom for steam. Score each baguette with a sharp blade (see scoring visual).
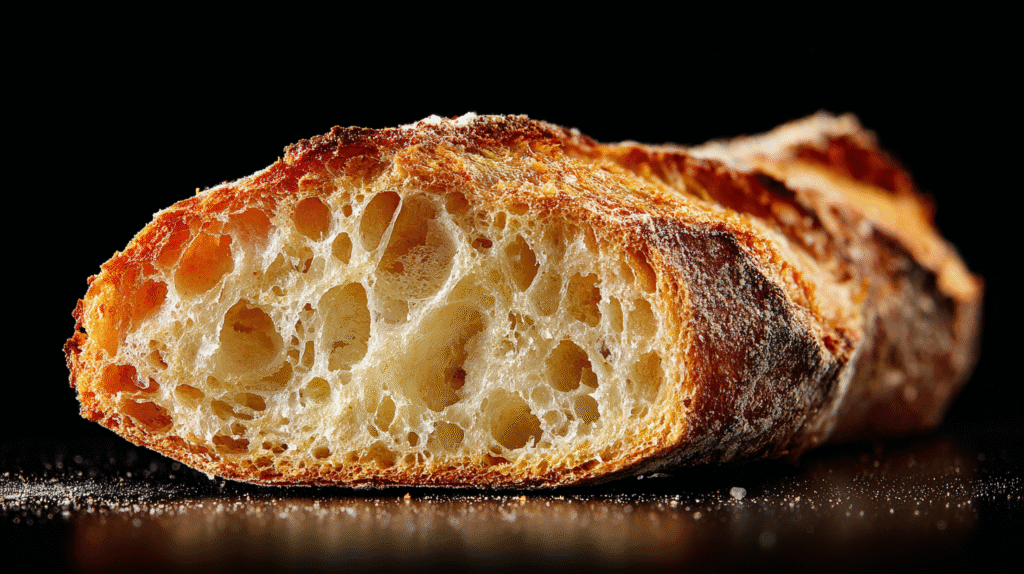
- Pour 1 cup hot water into the steam pan and bake 18–20 minutes until deep golden and crusty.
Substitutions & Dietary Swaps
- Flour: Swap up to 50% with whole wheat, adding 1–2 tbsp extra water if dough feels dry.
- Gluten-Free: Use a high-quality 1:1 GF baking blend and add 1 extra tsp yeast for better lift.
- Salt-Free: Reduce salt to ½ tsp but expect a softer crust.
Chef’s Pro Tips
- Create steam for a cracklier crust, don’t skip the water pan.
- Handle dough gently after the first rise to preserve gas pockets.
- Use a sharp razor for scoring; shallow cuts encourage controlled expansion.
- For extra color, mist baguettes lightly with water before baking.
Make Ahead, Storage & Reheating
- Make Ahead: Shape baguettes, refrigerate overnight, and bake the next day.
- Storage: Keep in a paper bag at room temperature for 24 hours.
- Long-Term: Freeze up to 3 months in airtight bags.
- Reheat: Bake at 350°F for 5–6 minutes to restore crustiness.
Troubleshooting & Common Mistakes
- Baguettes too pale: Increase baking time or ensure oven reaches full temperature.
- Tough crust: Not enough steam or overbaking.
- Dough too sticky: Slightly increase flour, 1 tbsp at a time.
- Flat baguettes: Under-kneading or over-proofing.
Flavor Pairings & Serving Suggestions
These crusty mini baguettes shine with soft cheeses, herb butters, warm soups, and roasted meats. For a classic French café moment, serve with salted butter and fruit preserves.
Pairing Recipes From Our Website

Crusty Mini Baguettes at Home
Ingredients
Equipment
Method
- Combine the warm water, sugar, and active dry yeast in a medium bowl. Whisk gently and let sit for 5–7 minutes until the mixture becomes foamy on top.
- In a large mixing bowl, combine the bread flour and salt. Make a well in the center and pour in the yeast mixture.
- Stir until a shaggy dough forms, then knead on a lightly floured surface for 8–10 minutes until the dough is smooth, elastic, and slightly tacky.
- Place the dough in a lightly oiled bowl, turning once to coat. Cover and let rise in a warm place for about 60 minutes, or until doubled in size.
- Punch down the dough gently to release excess gas. Divide into 6 equal pieces and roll each piece into a 6–7 inch mini baguette shape, tapering the ends slightly.
- Transfer the shaped mini baguettes to a parchment-lined baking sheet. Cover loosely and let rest for 20–30 minutes while you preheat the oven to 475°F (245°C).
- Place a metal pan on the bottom rack of the oven to create steam. Score each baguette with 2–3 diagonal slashes using a sharp razor or lame.
- Pour about 1 cup of hot water into the preheated metal pan, then immediately place the baguettes in the oven. Bake for 18–20 minutes until deep golden brown and crusty.
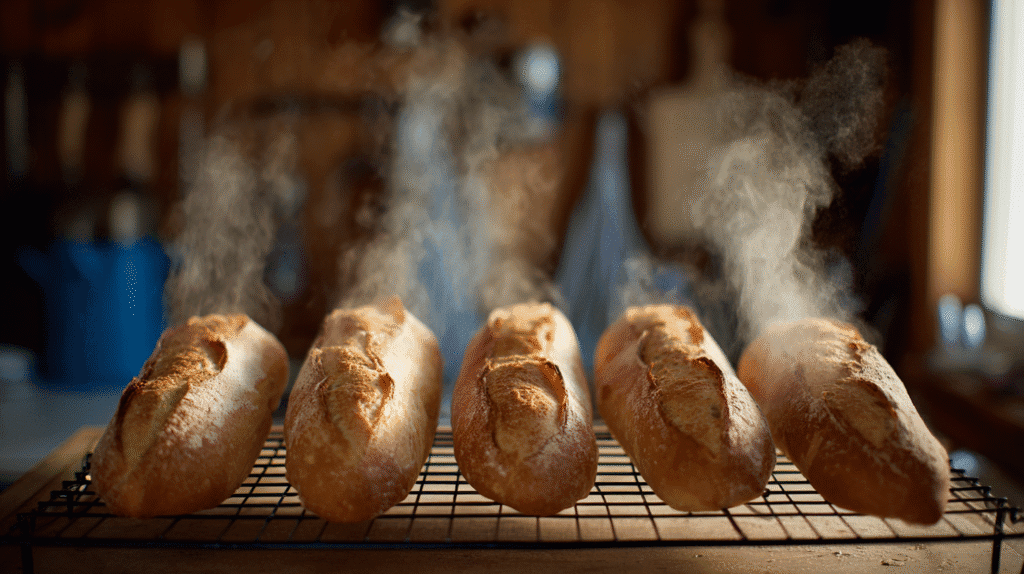
- Remove the crusty mini baguettes from the oven and cool on a wire rack for at least 10 minutes before serving.
Notes
FAQs
- Can I make these baguettes larger? Yes! bake an extra 5–7 minutes for full-size loaves.
- Can I use instant yeast? Yes, use the same amount and skip blooming.
- Why didn’t my baguettes rise? Water may have been too hot or yeast expired.
- Can I add herbs? Absolutely! mix 1–2 tsp dried herbs into the dough.
- How do I get bigger holes in the crumb? Handle dough gently and avoid degassing too much.
- Why is my crust soft after cooling? Let cool uncovered to avoid trapped steam.
Conclusion
Making crusty mini baguettes at home is easier, faster, and more rewarding than most bakers expect. With the right technique and just a few ingredients, you can enjoy bakery-quality loaves anytime. If you loved this recipe, explore more artisan bread tutorials and elevate your home baking skills.